Saturday, April 30, 2011

Bali Bowls


Well, I did it.  I made a Bali Bowl from Aunties Two.  I had always wanted to try this, but even though I watched clips of it on you tube, I seemed to be all thumbs.  So I took a class at Wish Upon A Quilt. 

First you have to prepare the 2 1/2" strips of fabric.  I used a jelly roll of batiks.


This is tedious and time consuming, and you iron lots more than you ever willingly did before in your life, depending on the size bowl you are making.  I used half of my jelly roll, which turned out to be 880" more or less, which is equivalent to over 73 feet, once the strips had been joined to each other.  I don't think I've ever ironed 73 feet of anything, even cumulatively, in my lifetime, especially since "iron" is the original four letter word.

You fold the strip wrong sides together, much as you would if you were preparing binding, and iron.  This creates a nice crease at the longitudinal halfway point of the strip.  Then you fold each long side in to this midpoint and reiron, creating finished edges that look like the strip above.  So now, as if 73 feet weren't bad enough, you RE-iron those same 73 feet on each side of the original fold!  This now is over 219 feet of ironing, which makes some of us want to just forget it and run away from home.  Only the promise that this part of the project was over permanently kept me from bailing at this point.

Next you place a soft cotton clothesline down the middle of this strip, right in the first fold you ironed.  Then fold the left side over the clothesline and snug it up tightly.  Next fold over the right side, encasing the clothesline snugly, and sew with a straight stitch down the middle of this tube you have created.  I found that it was easier to use a long stitch while doing this.  And I reset my Husqvarna Viking Designer I to heavy fabrics as well.


The next part isn't fun at first, but becomes exciting later on.  You fold about 1/2" of your covered clothesline back on itself and sew with the widest zigzag stitch on the side edge, keeping the original stitch line on the outside of the fold. This is very awkward to do at first, and you wonder if your machine will really be able to handle that thickness and still produce a nice stitch, but it works out, don't worry.  Sewing the strip this way keeps continually covering over the original stitch line as you add more and more loops around the original 1/2" starter loop.  That leaves a nice, smooth edge on the outside (not the side you are seeing) of the resulting bowl.  And, since you see this stitching inside and out, color coordinate both your bobbin and your upper thread to the fabric of the bowl.


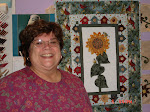
At some point you decide how wide you want the base of your bowl to be and stop there in order to tilt the base about 60 degrees to create the angled sides for the bowl.  The silly picture of me above shows an 11" base to my bowl.  I am in the process of tilting it even higher because I wanted the full 60 degree tilt to get a deeper finished bowl.


 As you continue to sew the strip to itself over and over, voila!  Sides emerge, and your bowl actually looks like a real bowl, wonder of wonders!  (That's the exciting part.) 


The last part is to put the binding on the top of the bowl.  I chose to pin the binding on the inside of the bowl, sew it in place, and then fold it out over the edge of the bowl and zig zag it down so that the sewing on the finished edge looked like the zigzag stitching in the rest of the bowl.   


And here's the finished product!  Now, that wasn't so hard, was it?  I might even do another one of these in the near future.  I can think of all kinds of gifts you could make with these:  they could hold pots of flowers, pinecones and scented potpourri, trick or treat goodies, dinner rolls, fat quarters;  smaller and more shallow ones for bureau top catch-alls or for toiletries in guest bathrooms;  larger tall ones for hampers,  medium height ones for toilet paper hiders in the bathroom or  large shallow ones for holding magazines  -- the possibilities are limited only by one's imagination!

Wednesday, April 27, 2011

Yard sale!


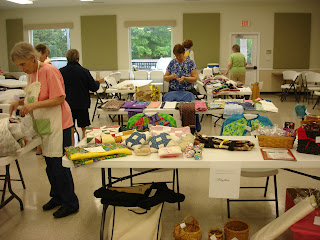
These are some of the ladies of the Lake Gaston Piecemakers Quilt Guild.  They are putting wonderful treasures on tables for an all out, first come, first served, grab 'em while they're hot free-for-all called our annual yard sale.

This is Lynne B standing by one of the three tables I FILLED with bags and flat folds of fabric for sale out of my ever expanding stash.  The bags were as color coordinated as I could manage, and the flat folds were 4, 6, 8, and 10 yards of various fabrics suitable for quilt backings.

Now, you need to know that as ladies, we start out politely perusing each others' tables and wares, commenting about the potential use of this or that.  But as we traverse the room, pausing at each table, our hunger for the new, the different, the unexpected, and the bargain evokes a change that is awesome to behold.

We bustle, we slide in, we stand dead center so we can see the whole thing best, no matter who else wants to see.  We pick things up, carry them around for five minutes, and then put them back down.  And all the time, we are salivating with the anticipation of what we will do to those fabrics once we get them home, even if we just sit in our sewing rooms and feel them for a bit.

Some start stockpiling.  A small mound appears in one spot on the floor.  The next bag of fabric, or the next box of Velcro, or the next pair of scissors -- whatever -- it is NECESSARY!  Bit by bit, the tops of the tables peek through as wares are purchased in the steady frenzy.  Women who came in well groomed, coifed and made up, clothes pressed, looking rested and cheerful, leave, their jackets flung over their arms as their temperatures rise with the effort to get there first and buy the best one.  Their brows glisten with perspiration (women don't sweat!), lipstick has been chewed off as budgets and choices are confronted.  Fatigue begins to show in their faces, but there's also a sense of VICTORY! They found a bargain ... or two... or several.

Our arms are heavy with bags of purchases that will soon be introduced to our stashes at home, soon be placed among the rest of the fabric family to be beamed upon and dreamed over until that perfect project is achieved. 
 
Now -- where to hide all this stuff from our hubbies until it can be sneaked into the house....

Monday, April 25, 2011

Red, white and blue!


Sue B is a dedicated QOV'er.  The quilt above was started by someone else who, apparently, got tired of trying to do the curved piecing.  Sue is undaunted by that sort of thing and finished it herself.  It's made up of many, many red, white and blue batiks, and is VERY busy, both in the patterns in the batiks and in the pattern of the quilt.


Now, when either the fabric or the design of the quilt is so busy that any quilting designs would be lost, what do you do? You do a pantograph that complements the quilt.  Since this quilt had lots and lots of curves, I chose a wild and wonky star surrounded by billowing cloud-like echoes.  Even on the back, which is also batiks, you can't see the design well except for the borders:


Some young soldier is going to love the intricacy of this quilt, and I hope it warms his/her heart to know that people like Sue still care.  There are other organizations who work to bring aid and comfort to our wounded troops, so check with your local organizations to see how you can help.

Also, check out my new blog:  http://www.lakeside-quilting.blogspot.com/ for some neat tools and tips!


Friday, April 22, 2011

Check this out!


Today is the first day I'm posting quilting information on my new blog: http://www.lakeside-quilting.blogspot.com/.  Check it out!  I show even more quilts from the MQX East show, as well as some of the goodies I bought there to try in my own quilting business.  Every few days, I'll add some more goodies for you on that blog, and you can decide if they are relevant to your own quilting.

The quilt above looks more like the ones I get for quilting.  I haven't done a really detailed show quilt for anyone yet, but my sister has one that she made for her daughter's wedding (October, 2012!), and I have been given the opportunity to do the "heavy" quilting on it.  More on that at a later date.

Here's another pretty to admire.


                         What's not to love about this one!?  Those feathers are all freehand.  Woo hoo!

Wednesday, April 20, 2011

MQX LOL IQP HSH


From April 12 to 16 this year, I had the extreme pleasure of attending Machine Quilters Exposition East (MQX) in Providence, RI with my quilting buddy, Mary.  Mary grew up in Newport, RI and had wonderful tales to tell about those years.  We rented a car and toured the streets in Newport where her family home had been, her school, the beaches, favorite haunts -- each with a tale of its own.  The day was grey and blustery, but that didn't dissuade us from our mission one bit!  Lots of laughs along the way, despite the cold and occasional rain.


Eventually, it was time to end the nostalgic sightseeing and go to the Westin in Providence, next to the Convention Center where the show and classes were being held.  The picture at the top of this page is just an example of the startlingly intricate quilts that were in the show, and the one above this paragraph illustrates the finely detailed quilting that could be found in all of the quilts.  After all, this contest was showcasing the quilting more than the piecing -- just the opposite of the usual quilt show.  I was humbled by the expertise demonstrated here. Although I don't think I ever want to drive myself crazy doing such intense quilting on any of my (or my customers') quilts, I really appreciated the fine work done by each and every entrant in the contest.


I took a variety of classes this year, but the best -- and most relevant -- ones were given by this cheerful lady, Crystal Smythe.  What Crystal doesn't know about the Intelliquilter computerized robotics system hasn't been invented yet.  When I attend these classes, it is as much to confirm that I am up to date as it is to learn something new, which doesn't always happen if I am really up to date -- a sort of IQ catch-22.  However, Crystal was able to pass along at least one new use of my system (or remind me of one I hadn't used yet) in each of my three classes with her, as well as make the time fly so quickly that I thoroughly enjoyed her unique personality and its painless delivery of highly technical procedures.


Back in our room, Mary and I each had projects we had brought -- knitting for her, crochet for me, reading for both of us.  However, one that we shared was this adorable scissor fob that I had brought along for each of us to do.  The kit was by Sue Spargo.  These are some of the pieces.  You can see more on Mary's blog as well as her version of the bird.  She thinks outside the box better than I do.


My little bird, complete with felted balls for the feet and top, beads, buttons, and hand sewing. 

After a very full week, we headed for Home Sweet Home!  Tomorrow I'll show you some goodies I bought to try out during my machine quilting.

Wednesday, April 6, 2011

MISSION ACCOMPLISHED!


You may recall from a few days ago that a major gardening undertaking was in progress at our house.  The next day, Monday, we had delivered 10 cubic yards of a mixture of mulch, fertilizer and compost guaranteed to grow anything that had roots.  I, of course, being the doomsayer, immediately thought of weeds.  But at least they'll be super easy to pull out of this mixture.  My workers came back after their regular jobs Monday evening and loaded all this into the flower bed.  In the end, it was almost one foot deep, but with the rain coming that night and next day, and settling in general, it was going to be about 6" deep in a month or so.  And turn into rich soil by next year.

I went out to one of the local nurseries to buy some colorful spring flowering plants.  Here are my choices:


You will also see a huge roll of batting on the right side of my SUV.  Doesn't everyone carry one of these, just in case she has a quilting attack?  No?  Well, I have been carrying this baby around for two weeks and showing up at all my guild functions so that people can get the batting they need to finish their quilts.  This is part of my job as Outreach Chairperson for the guild.  However, I'm done for now.  I have some things I have to do over the next two weeks, so the batting has been safely restored to its resting place in my studio.

The red flowers are petunias.  There's a fuschia colored azalea in there, several ageratum (blue feathery tufts), blue fescue (blue-green grassy plant), golden orangey iris, and a luscious light and dark purple streaked day lily.  There's also a spreading bushy plant that's blue, which I think is called a delphinium, but I lost the tag, so I'm not sure.  I wanted phlox, which have been sold out for awhile I'm discovering, but I found a wild patch along the road out here in the countryside, and I plan to sneak up on it when it's least expecting me and dig some of it up!


Although this looks a little sparse right now, as the season wears on, the plants will spread out a little and fill their spaces.  And I can always add some pansies, which bloom forever.  The last thing I'm going to add is a white dogwood in this garden, and two whites and one red in the garden near the entrance to the driveway.

Tomorrow the workers are supposed to come back to dig up some VERY prolific spreading tea roses from a more defined garden, which they overran last year and had to be cut back severely, and plant them along the steep bank on one side of my driveway.  They bloom into the fall -- I think the last time I saw any blooms last year was in November! -- and will be both lovely to look at and useful as soil stabilizers on that bank.


Sunday, April 3, 2011

SPRING IS IN THE AIR


I love blooming things, and I have always wanted to know the names of them, much like learning the names of the various fish and corals when I started scuba diving.  I believe that this pink flowering shrub growing in front of my garage is an Abelia of some sort, but I won't mind a bit if you can identify it as something else and let me know.

FLASH!  I have just been informed by the man who owns the nursery from which I bought these plants two years ago that they are called Loropetalum.  They come in two varieties:  white and pink.  And you know the rest.

Once things start flowering, I get all antsy to put more flowers in the soil.  This year I overdid it a little.  I decided that I needed a true flower bed in front of the house.  Even though the stone and brick is beautiful, the all gravel HUGE parking area in front of the house makes it look kinda industrial in nature.  This sort of appearance appeals only to one sex, and it's NOT female.


So I said to myself, "Self, you need something to soften the harsh nature of the parking area.  You need flowers.  But before you can plant flowers, you need a flower bed."  So DH had a friend who knew someone, etc/etc/etc. and we spent the day with three of the most industrious workers we had ever hired!  At the end of the day, they had removed the top 6" of gravel from the parking area near the stone wall and had built another wall about 6 feet out from the previous one, making quite a large garden space.  The bed of this new garden is nice and flat, and tomorrow one of the local nurseries will be delivering many cubic yards of soil with fertilizer and peat mixed in.

Once the soil is in place, I will happily go out to find the prettiest phlox in the area and plant it all along the new wall.  I will also put in at least one azalea, although the local lore is that you're only providing delicacies for the local deer if you do that.  Maybe I can fashion some sort of fence around and over the poor thing while it is trying to take root in a new place.


One thing that loves to grow here and seems immune to the deer is vinca.  Someone told me that this plant is periwinkle.  Of course, this happens to be one plant that I actually do know the name of, so right away I was ready for battle.  However, age has impressed on me that there are times when I am quite sure I'm right and God or fate decides to teach me a lesson, so I went to the internet to get the answer.  Turns out that periwinkle is just another name for vinca.  Good thing.  I don't relish correcting a friend, but neither do I enjoy losing a bet/argument.  It's a lose/lose situation, so it was especially nice that we were both right.  This volunteer plant is one of several that have decided to populate the steep bank that curves around and slopes down from my driveway.  I hope it invites lots of its friends to come and live here, too.

Tomorrow is a quilting day.  It's supposed to be 81 degrees down here in EBF, VA, so the pull will be to be outdoors planting things once the soil arrives.  I will have to be extra diligent in the morning so I can play in the afternoon in my new garden.


I'll leave you with a picture of Sarah W's magnificent bargello quilt.  We haven't found out who won any of the ribbons from the show at the library yet, but this one certainly deserves to win first place.  It's stunning!