Wednesday, January 11, 2012

BABY STEPS


I have finished one UFO.  Sadly, it was not on my 12 UFO's list to do over this year, because I would like to have credit for finishing it.  This is a picture of the completed class sample for my Painless Cathedral Windows project, all quilted and bound.


And here's the most recent crazy quilt block for my embroidery quilt.  Fifteen more to go.  You can't see it well unless you click on the picture to enlarge it.

Today is guild, followed by at least 3 hours finishing my ugly fabric challenge.  (There are those who do not think that this fabric is ugly, but I assure you -- it is.)

And tonight the ladies in my development are getting together to plan our activities for the coming year.  We are a very diverse group.  Many retirees.  Some young folks just starting their families.  And the occasional mid-age woman well ensconced in her career and enjoying the benefits of living at the lake while continuing to reap the fruits of her efforts in building her business and reputation.  I remember those days with fondness but am very glad to have these elder years to rest and amuse myself with things that interest me and that don't have timetables attached.  What am I saying?!  I DO have timetables -- getting classes organized, doing quilting for others, and at the very least, getting dinner on the table before midnight! 

Silly me!  And here I thought I was retired....

Tuesday, January 3, 2012

MY 12 UFO'S

Patchwork Times is having a UFO contest of sorts.  We are to list 12 of our UFO's (if only there WERE just 12!), and each month, Patchwork Times will draw a number, and that will be the UFO we work on for the month.

So here are my 12 UFO's for the year:
1)  Wool Christmas pitcher applique project finished and framed

2)  Fons and Porter applique and pieced quilt assembled and quilted
3)  Bonnie Hunter cruise quilt assembled and quilted
4)  Guild ugly fabric challenge quilt completed entirely
5)  Finish appliqued Christmas table runner
6)  Complete all 20 embroidered crazy quilt blocks and assemble and quilt
7)  Quilt sisty's star quilt
8)  Finish applique on Doheny quilt
9)  Quilt my stars and stripes quilt
10)  Assemble and quilt braided plaids quilt
11)  Finish applique and quilt Pat Sloan cruise wall hanging
12)  Assemble and quilt mantel quilt


These all seem doable except for the Doheny quilt, which is quite intricate and time consuming, so it always gets set back on the shelf when I want something to take out of my UFO stash to do.  Hmmmm.  Seems I'm not much on commitment.  Gotta work on that.

FOUR DOWN, OODLES TO GO!


This is the completed top for the Painless Cathedral Windows project I'll be teaching my guild in two weeks.  I hope I can get it quilted before then, but if not, at least they will see what the finished pattern looks like.  Some people learn by watching.  I'm one of those.  Some learn by doing.  I'm also one of those, but I DO better if I have SEEN what I'm supposed to be doing first. 


These three blocks are #'s 2, 3 and 4 in the 20 block series of crazy quilt embroidered blocks that I started wayyyyyyy back in October.  I couldn't make the November class because I went on a cruise with my sisty.  And I couldn't make the December class because DH and I went out to California to celebrate his mom's 80th birthday.


So, I updated my DD sewing/embroidery machine with the newest updates put out by Husqvarna Viking and sat down to try to catch up a few days ago.  My machine coughed, sputtered, and plastered a "motor overload" message on its screen.   I tried cleaning it, contacting the HV yahoo group for advice, and asking Sherry, my local computer and HV and software guru.  Nothing.  So I guessed I should just take it into the shop.  Trouble is, the shop is an hour and a half away.  I don't make those long trips for just one thing.  My next 5D software lesson wasn't going to be until the 17th, and I could take in my cantankerous beastie then, but I was feeling dismal about having to miss yet ANOTHER embroidery lesson!


So I loaded up the machine with hoop and fabric and thought I'd just give it a whirl.  The doltish devil wouldn't even read the USB with the patterns in it.  In a last ditch effort, I put it through the commands to download the updates from the USB stick (I had done it by cable the last time when it refused the stick), and this time the machine took the update like a dream and started stitching out with only an occasional motor overload message.

I'm still going to take it in to be checked, but it's good enough for me to take it to my lesson this week.  Hurray!!

Sunday, January 1, 2012

PAINLESS CATHEDRAL WINDOWS 2

In the first installment of this demonstration of a new twist on the cathedral windows block, we prepared our fabrics, cutting and ironing them to specific shapes and sizes.  Then we made leaf units (40) for this particular project.


Now that we have made our leaf units, we need to put four of them together to make a cathedral window block (CW).  Sew one leaf unit to another, raw edge to raw edge along one side, so that the folded edges make a "V".   Do the same thing with another pair of leaf units, but turn them upside down when finished so that the "V" mirrors that from the first two units.  Sew these two sections together.


You now have one cathedral window (CW) block.  The folded edges make an "X" across the block, as above.  Make 9 of these.  You will need to join two of the CW blocks to make one CW rectangle.  Make 4 rectangles, leaving one square CW block for the center of the tabletopper.


Now we need to work on the corner squares.  Sew one leaf unit to one 3 1/2" background square so that the leaf unit's folded edges are tilted up from left to right as above.


Next sew a 3 1/2" x 6 1/2" background rectangles to the duo above, keeping the folded edges of the original leaf unit going in the right direction as seen here.  You now have a corner block (CB).  Make four of these.


To make the center, take the left over square CW block and add a 3 1/2" x 6 1/2" background rectangle to either side.  Press to the background fabric.  Then sew a 3 1/2" x 12 1/2" background rectangle to the top and another to the bottom of this.  You now have a square measuring 12 1/2" with the CW in the center.

So, what do we do with all this?


Assemble the first row of the tabletopper by sewing a corner block to a CW rectangle (2 CW's) and then add another corner block.  Keep in mind that we want these corner blocks to mirror each other.  You can place your corner blocks so that they look like mine, above, with the leaf units in the inner corners, or you can turn them so that the leaf units are in the outer corners.  Try them both ways to see what appeals to you.  Make 2 of these long rectangle units, one for the first row and one for the last row of your tabletopper.


Next sew one CW rectangle (2 CW's) to each side of the center block you created earlier.  Press towards the background fabric.  Then sew your first row to the top of this center unit and sew the last row to the bottom.  Make sure that you have a mirror image between top and bottom.  You can now see the subtle secondary pattern starting to emerge.

We aren't quite finished yet.  We still have to tack back those folded edges to create the cathedral windows appearance we all love.  This is just one 24" block, but several would make a stunning quilt.  You could also play with the placement of your basic units to make long table runners, zig zag paths for the CW's, smaller ones for candle mats, elongated ones for placemats, sew them into a purse or pillow, alternate rows of CW's with rows of background fabric, or place the CW's on point -- so many creative ways to use this simplified approach to the cathedral window look.

In the next few days, I will show you the folded edges all tacked back and perhaps even begin to experiment a little more with this pattern, trying it in reverse, or combining the units in some other fashion.  Try it for yourself!  Let your imagination go wild! 

Friday, December 30, 2011

PAINLESS CATHEDRAL WINDOWS


This idea is not original with me, but, having seen some quilts done this way, I have decided to spend a day teaching my guild members how to create the cathedral window look in a new way.  You can make any size block, any size quilt, any combination of colors, and any order of base and top pairings.  Here's how it starts. 

I wanted to make a 24" square table topper.  I had in mind four corner sections and a separate center with the cathedral windows in it, surrounded by my background color and then bordered by more cathedral windows.

I decided to use white as my background fabric and twelve 3 1/2" strips of Kaffe Fassett yummies.  This particular way of combining the fabrics will be the reverse of what you usually see in cathedral windows, where the outside (or top fabric) is white and the leaf (or arced) section is in colored fabric. 

Because I wanted a 24" topper, I divided my top into 8 x 8 sections in my square.  Each section, therefore, measured 3" x 3".  This allowed me to have a four section cathedral window block (finished size = 6") with the white peeking out from under the folded back colors.  But more of the design as the pattern emerges.

What you see above is cut from 3 1/2" strips, one from each of 12 fat quarters:  Eighty Kaffe Fassett squares 3 1/2 x 3 1/2", 40 white squares the same size plus four more 3 1/2" white squares for the corner treatments,  six white 3 1/2 x 6 1/2" rectangles and two white 3 1/2 x 12 1/2" rectangles.  You can use as many colors or fabrics as you wish, and nothing has to match if you want it to be nice and scrappy.  At the very least, however, use four different colors and eight different fabrics to get some texture into the finished project.

You fold each of the colored squares in half right sides out and press them so that they form triangles.  That's what you see so far in the first picture.


Next I placed two of the colored fabric triangles over each of the 40 white squares and pinned them so that the outer raw edges met and the center folds touched but did not overlap.  The last step for this first part of the preparation for assembling the cathedral window block is to sew the outer edges with a basting stitch about 1/8" in from the edge.  This will keep the triangles from slipping in the next part of the project, which I will publish in a few days.


Here's a picture of the first PCW block I made earlier this year, with some of the top triangles pinned back in preparation for sewing those edges to reveal the white fabric underneath.  This is NOT the design for our January project, but it gives you a hint of how things are going to evolve, in case your curiosity is killing you.

Friday, December 9, 2011

ELLEN'S 80TH


My MIL is quite a lady.  Half-Italian, she's an incredible cook.  She also has the best Mexican food recipes, and I have happily tasted and collected each one.  Yum!  She has the energy level of a 50 year old and the memory of someone in her 30's.  Petite and curvy, she can still turn heads when she comes in the room.  I think she may have kept every gift ever given to her since birth, and she remembers who gave it to her, too.

I admire Ellen for her sustained good will to all, her cheerful disposition, her inventive and creative mind and her indomitable spirit. Most of all I admire her for LIVING her life and making every day full and rewarding.

This past Sunday was her 80th birthday, so DH and I flew out to California Thursday to surprise her.  The result was everything we hoped it would be -- shock, joy, tears, and lots of hugs.  We caught up with the family at the birthday party --  nieces and nephew and cousins and brothers and sister -- extracting promises to come and visit us in the near future.  Well, you know how that goes -- all good intentions at the time but life gets in the way, so we're not holding our breath.  Nonetheless, we miss all those folks and hope that at least one or two manages to land in our neck of the woods once in awhile.

Time for reflection.  None of us knows how long we have on this earth, but the older I get, the more I love being here, and the less I want to leave, ever.  I want to breathe this clean country air, kiss my grandchildren, laugh with DH, marvel at the sunsets, and gather precious memories forever.  So I try not to squander this precious time, whatever it is, that is allotted to me.

Besides, I can't go until I have used up all my fabric, right?

Thursday, December 8, 2011

Catch up time!

It's been forever since this blog was updated, so I guess I'd better fill you all in.


In November, my sisty, Missy, and I went on our first cruise.  This was a combination quilting/sightseeing cruise (read that to mean shopping...), and we had a ball!  Our ship was the Royal Caribbean Enchantment of the Seas out of Baltimore, MD harbor.  The stateroom was spare but had a nice, big window and was adequate for our needs.  This picture is of our ship docked at Labadee, Haiti.


Here's a shot of the interior of the ship.  It seemed there was always music playing somewhere, and in the evenings there was dancing or shows to entertain us.  During the day while we were at sea, we worked on quilting projects created just for us by our teachers, Bonnie Hunter and Pat Sloan!


Bonnie is known for her extraordinary scrap quilts, and Pat is our applique guru.


Missy and I took Bonnie's class on the first day.  Bonnie introduced us to the Baby Lock machines provided by a dealer in Florida, and we made a small needle case with them just to get the hang of how they worked.


Here's the finished project from the familiarization exercise with the sewing machines.  We worked on the blocks for Bonnie's quilting project after making this needle case.  There were four days at sea -- two down and two back.  Two of those days were spent with Bonnie.  Although all my blocks are made, I haven't assembled them yet, so I'll post the final result of those classes another day.


On the second day at sea, we began Pat's class.  Again, we had a small initial project to do prior to starting on Pat's special pattern for us.  Here's my wool applique needle case from Pat's warm up exercise.


Cute little thing, isn't it?  I hadn't finished the stitching around the outside of the case when I took this picture, but you get the idea.


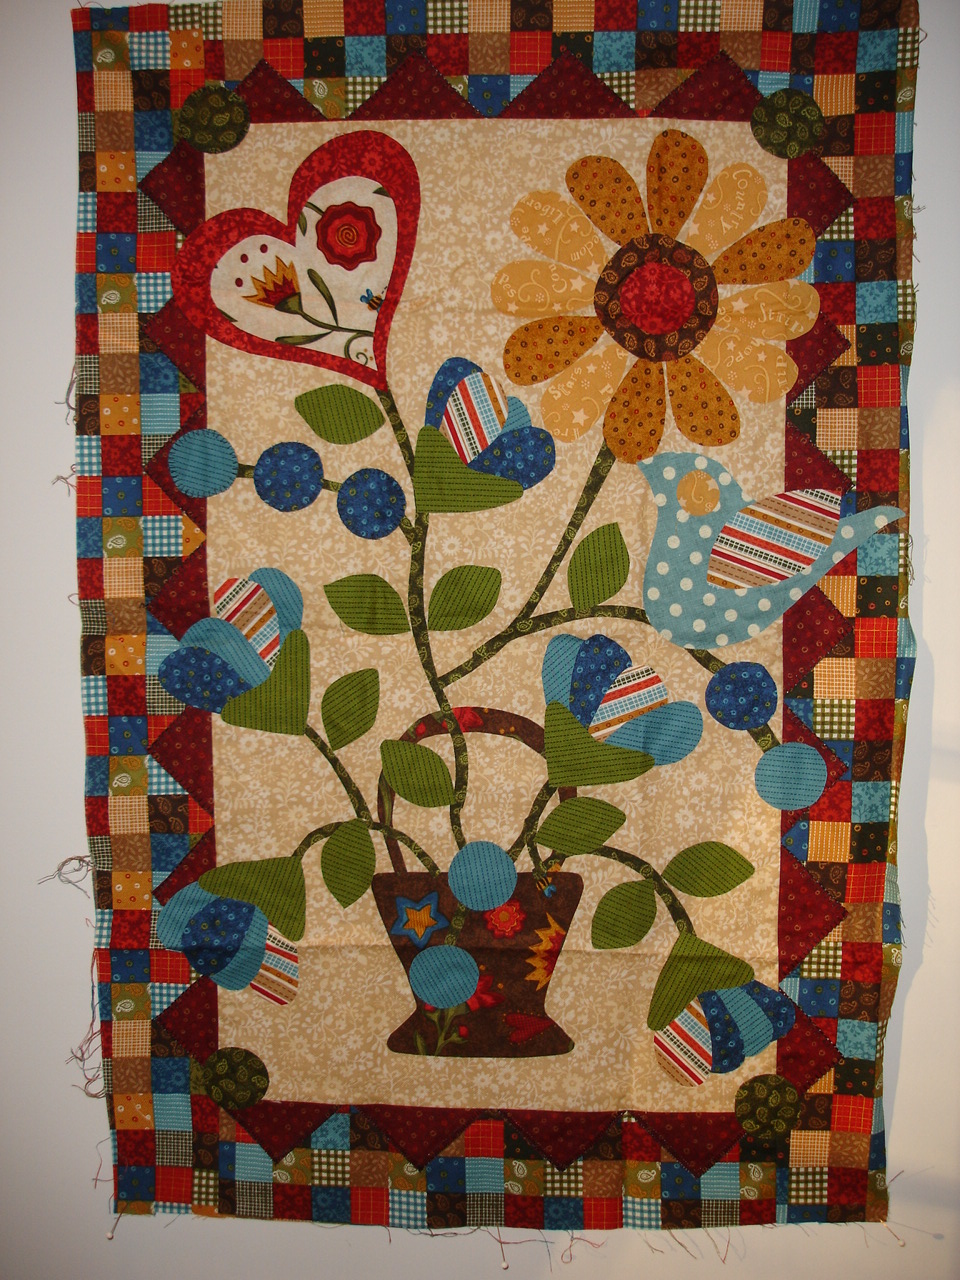
This is the final project, all assembled but not all appliqued, for Pat's class.  I will be doing machine applique in a blanket stitch for this wall hanging.


We were heading first for Puerto Rico and arrived there around 1 PM on the third day at sea.  This pictures El Morro, the fort that sits at the entrance to the harbor.


With very little time for shopping, we briskly walked the narrow, cobbled streets of old San Juan, finding this and that for our families back home and enjoying the architecture.


I never did find out exactly what this building was, but someone thought it housed part of the city government.  I thought it was charming.


On the fourth day of the cruise, we landed at St. Thomas, USVI.  This is one of my favorite islands in the Caribbean.  DH and I used to come here annually for my medical conferences and some wonderful scuba diving, but we stopped after several tourists were murdered, preferring the safety of Grand Cayman thereafter -- and GC has better diving.


Nonetheless, you can't beat St. Thomas for shopping.  Sisty and I did our share to boost the economy of that small island, I can assure you.  One has to bargain in the Caribbean.  You must NEVER accept the asking price for anything, or you will be taken to the cleaners.  If the vendor asks $100, you start at $10, because chances are that he paid no more than that for the item.  However, this is not for the faint of heart, nor is it for those who do not know the true value of an item, particularly gems.  Here we are with our favorite jeweler.  At one point, I was ready to walk out the door without a purchase and thanked him for his time.  Need I say more?  I have a lovely ring and watch as a result.


Our next stop was Samana, Dominican Republic.  DH and I had vacationed for our first anniversary on the northern side of the DR during a gasoline rationing crisis where the lines were miles long and the gas stations had armed guards and the locals'  idea of scuba diving was to take 8 divers out in a small dinghy and throw them overboard with their gear and tell them to gear up in the water, so we had never returned.  Most of the island looks like this.


We were greeted with residents clothed in traditional colorful holiday garb and swaying to steel drum music that was impossible to keep from dancing to along with them.  Small lorries that held up to four passengers were powered by one man on a scooter at the front.  Housing was dismal, and the pretty homes on the hills were only for the very rich.  Closer to the town, the government had made a mighty effort to clean up the view from the main street and had built or refurbished small adjoining cottages that housed souvenir stores.  Outrageous prices demanded serious and sustained haggling to get the cost down to something even vaguely comparable to the price in the US.  Of course, I LOVE to haggle, so I got that $55 hat down to $3 in no time.  Heaven help those meek souls who bought anything at face value, though!


I must admit that I was very concerned to be visiting Haiti, what with all the poverty and storm damage and crime on that island.  I thought that a bunch of rich (comparatively) tourists should not descend on a town that was desperate for reconstruction and just the basics of life.  So I was not prepared for Labadee, which is a peninsula privately owned by the Royal Caribbean lines.  The scenery was breathtaking.  The beaches were clean and the water a wonderful Caribbean turquoise blue.  Because this part of the island is privately owned, we were prohibited from leaving this portion to tour any other part of the island.  Local craftspeople had remarkable painted clothes, well turned wooden boxes, beautifully fired ceramics, and some of the best painted steel drum sculptures I have ever seen.  The prices were pretty much the same as in the states for such mementos, and the locals were not very flexible in their bargaining, but I bought a few things to take home with me anyway.

So, we bid adieu to this lovely place and spent the next two days at sea, where our course took us through a major storm that we could not escape.  This was my first experience with aiming for one place and ending up at another whenever I sallied forth from my cabin in those tumultuous seas.  Fortunately, neither sisty nor I got seasick and were able to enjoy our final two days of classes.  We even got up VERY early the last morning in order to see the coastline from Virginia Beach north and to watch the sun come up over the Bay Bridge.

Would I do it again?  Well, let me break that down into quilting cruise vs cruise alone.  Maybe to the quilting cruise, and no to the cruise alone.  Unless DH was with me so I could dance under the stars and have him to share the romance of the seas.  I have to say that if I didn't have the quilting projects to fill my time, though, I would have been a bit bored on this trip on the days that we were at sea.  DH and I, being scuba divers, much prefer flying to a land base and exploring from there, both the under water beauty and the sights and activites on land.  Going out here and there with unknown diving companies at various islands is not our scene. So we're not likely to take a long ocean voyage in the near future.  But I wouldn't mind flying to the Greek Isles and then touring them by boat.  Or Loch Ness.  Or the fjords of Norway.  Something new and different to see.  So we'll just have to keep our minds open about all that.